

 Login
Login

 December 16, 2021
Operating System Patching has always been a management overhead. AWS Systems Manager is considered a better option for patching different types of machines. The OS patching process can be automated. Organizations these days have multiple AWS Accounts that need to centralize the patching process to reduce time required overhead for enterprise-wide configuration, operational actions, and compliance remediation. This blog illustrates in a step-by-step manner that how to use AWS Systems Manager Automation to patch managed instances across multiple AWS accounts and Regions. We are using the capability of Resource Groups, and IAM assumes the Role to patch the machine from a Central Account.
What is Operating System Patching?
Patches are operating systems and software updates that are released in periodical intervals to ensure any vulnerabilities prevalent in the operating systems or software are eliminated. Also, software patches are released by companies to ensure security enhancements and fix performance bugs.
- Cloud Migration
- Devops
- AIML & IoT
What is AWS Systems Manager Patch Manager?
Updating patches manually is a laborious process. AWS Systems Manager Patch Manager automates the process of updating Windows and Linux-managed instances. Patches can be installed individually or to a large group of instances by using Amazon EC2 tags.
AWS Systems Manager follows the following 4 step process to ensure Centralized Multi-Account OS Patching:
Step 1: Creating resource groups
Resource groups makes simultaneous management and automation of large numbers of resources easier. These resource groups can be created based on a server function, for example, web servers and databases. In addition, resource groups can help you avoid deploying patches to the wrong set of instances.
After opening the AWS Systems Manager console, select “Find Resources” from the left navigation pane. The group of instances that we want to patch have been tagged in the example that follows.
I am providing the below values to Resource Groups and Tags,
Resource Group Name: RG-Linux-SSM
ResourceGroup Tag Key: ssm-linuxpatching
ResourceGroup Tag Value: True
A fleet of instances with these tags can be patched using this approach.
Go to AWS Console and open “Resource Groups & Tag Editor” from the service list,
Click on “Create resource group,”

Select Group Type as Tag-based and Resource Type as AWS::EC2::Instance,

Provide the Tag name based on the use case; once you add the tag, you can click on the Preview group resources option. So, you can view that the Instances come under Resource Groups.

We need to create Resource Groups in all Accounts (Managed and Target Accounts).
Step 2: Set up the required IAM roles
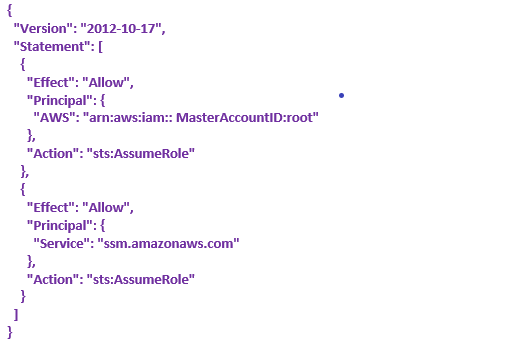
First, log in to the Master Account and create the following IAM Roles,
- SSM-Automationexecution-role
Attach AmazonSSMAutomationRole(AWS Managed Policy) and add ExecutionPolicy as Inline.
- ExecutionPolicy
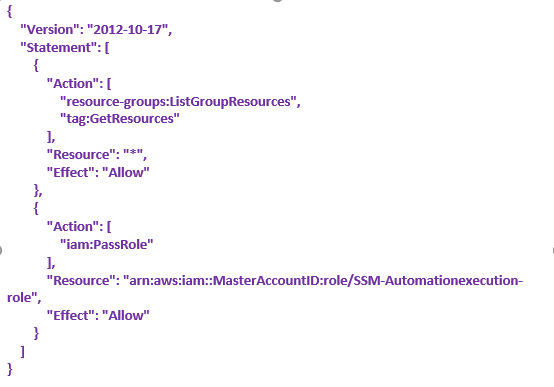
Then Edit “Trust Relationships” and provide the following policy,
- SSM-Automationadministration-role
Add below Inline Policies,
- AssumeRole-AWSSystemsManagerAutomationExecutionRole

- PassRole-AutomationAdministrationRole

Note: Make sure to replace <MasterAccountId> in the policy below with the account ID of the master account.
Now we need to log in to Our Target Accounts and create the following IAM Roles,
- SSM-Automationexecution-role
Attach AmazonSSMAutomationRole(AWS Managed Policy) and add below Inline policies,
- cloudtrail
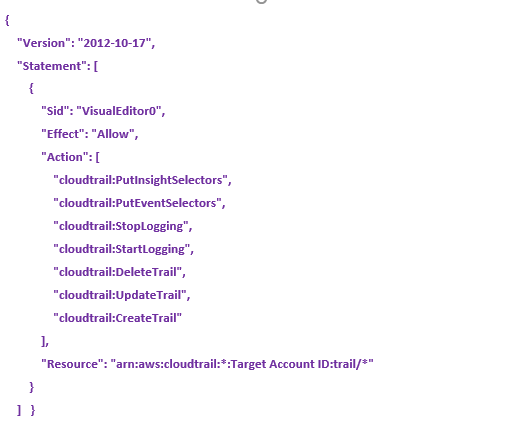
- ExecutionPolicy


Edit trust relationships and add the following,

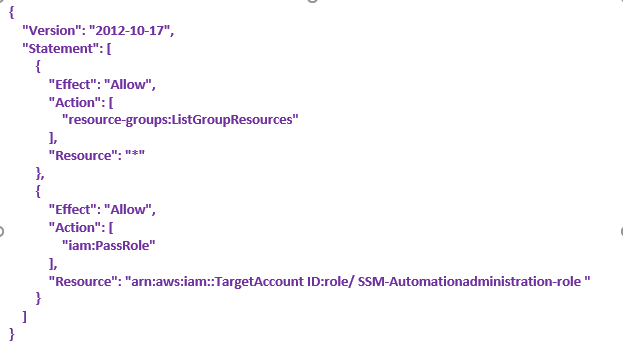
- SSM-Automationadministration-role
Add below Inline policies,
- AssumeRole-AWSSystemsManagerAutomationExecutionRole

- ssmadmin
Step 3: Patch Baselines Configuration
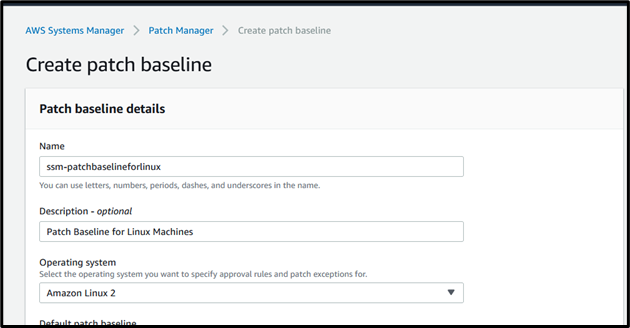
The patch baselines define which patches are approved for installation on your instances based on approval rules. AWS Systems Manager Patch Manager provides predefined patch baselines for each supported operating system. Go to “System Manager” in the management account and select “Patch Manager” from the menu, then click on view predefined patch baselines. Then click on “Create Patch Baseline,”

Provide Patch Baseline Name as “ssm-patchbaselineforlinux” and description as “Patch Baseline for Linux Machines.”
Select OS, (Here I am taking Amazon Linux 2).
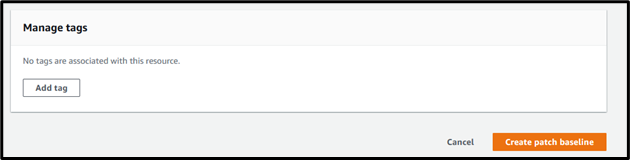
Select Product as your OS. Severity and classification as per your requirement,

Then Click on Create patch baseline option,
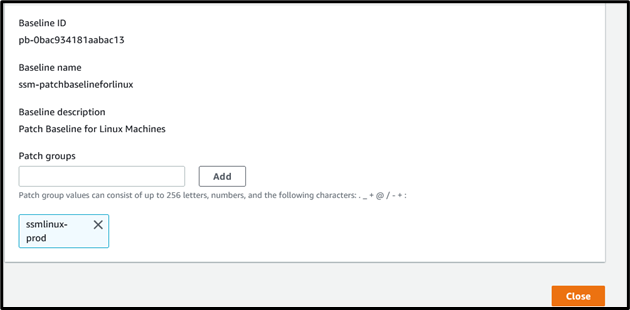
Each patch baselines should be associated with Patch Group. A patch group is created using Amazon EC2 tags and must be defined with the tag key Patch Group.
The patch group is used to associate instances with a specific patch baseline.
In this scenario, I created a patch group named “ssmlinux-prod” and associated it with the custom patch baseline.
Go to the Patch Manager and select the patch baseline which we created earlier, click on Actions and Modify patch groups,
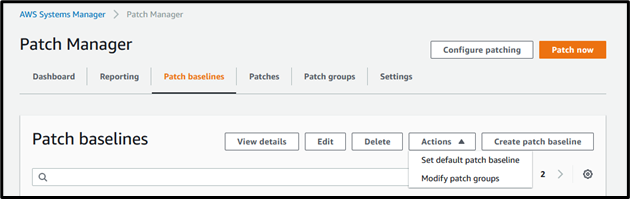
Provide Patch Group Name and click on Add.
Step 4:Create an Automation Document to execute patch baseline operations
I have created a custom Automation Document in the management account, which will execute the Command Document AWS-RunPatchBaseline. From the AWS Systems Manager console of the management account, select “Documents” from the left navigation pane.
Choose Create document.
- Type a descriptive name for the document. For this example, I will use Automation-RunPatchBaseline.
- In the Document type list, choose the type of Automation document.
- Delete the default content in the Content field and paste the following JSON content.
- Choose Create document to save the document
{
“outputs”: [ “runPatchBaseline.Output” ], “description”: “Automation document to execute the Command document AWS-RunPatchBaseline”,
“schemaVersion”: “0.3”,
“assumeRole”: “{{AutomationAssumeRole}}”,
“parameters”: {
“AutomationAssumeRole”: {
“type”: “String”,
“description”: “(Optional) The ARN of the role that allows Automation to perform the actions on your behalf.”,
“default”: “”
},
“Operation”: {
“allowedValues”: [
“Scan”,
“Install”
],
“description”: “(Required) The update or configuration to perform on the instance. The system checks if patches specified in the patch baseline are installed on the instance. The install operation installs patches missing from the baseline.”,
“type”: “String”
},
“SnapshotId”: {
“default”: “”,
“description”: “(Optional) The snapshot ID to use to retrieve a patch baseline snapshot.”,
“type”: “String”,
“allowedPattern”: “(^$)|^[0-9a-fA-F]{8}-[0-9a-fA-F]{4}-[0-9a-fA-F]{4}-[0-9a-fA-F]{4}-[0-9a-fA-F]{12}$”
},
“InstanceId”: {
“description”: “(Required) EC2 InstanceId to which we apply the patch-baseline”,
“type”: “String”
},
“InstallOverrideList”: {
“default”: “”,
“description”: “(Optional) An https URL or an Amazon S3 path-style URL to the list of patches to be installed. This patch installation list overrides the patches specified by the default patch baseline.”,
“type”: “String”,
“allowedPattern”: “(^$)|^https://.+$|^s3://([^/]+)/(.*?([^/]+))$”
}
},
“mainSteps”: [
{
“maxAttempts”: 3,
“inputs”: {
“Parameters”: {
“SnapshotId”: “{{SnapshotId}}”,
“InstallOverrideList”: “{{InstallOverrideList}}”,
“Operation”: “{{Operation}}”
},
“InstanceIds”: [
“{{InstanceId}}”
],
“DocumentName”: “AWS-RunPatchBaseline”
},
“name”: “runPatchBaseline”,
“action”: “aws:runCommand”,
“timeoutSeconds”: 7200,
“onFailure”: “Abort”
}
]
}
Step 5: Execute Automation to patch resources in target accounts
In the management account AWS Systems Manager console, select Automation from the left navigation pane and select Execute Automation.


- In the Choose document section, select the custom Automation Document created in Step 3, Automation-RunPatchBaseline, and then click Next.
- Select Multi-account and Region tab.
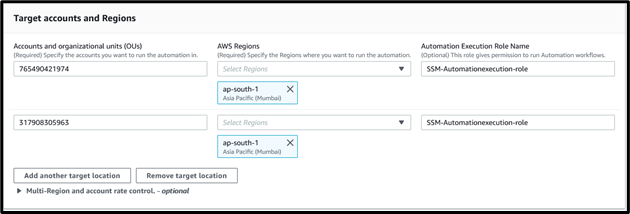
- In the Target accounts and Regions section:
- Provide the account IDs of the target accounts and specify the Regions where the EC2 instances are launched.
- Provide Automation Execution Role Name as SSM-Automationexecution-role
- In the Targets section:
- Select Resource Group as the Targets.
- Select InstanceId as the Parameter.
- Select your Resource group name.
- In the Input parameters section:
- Specify Install as the Operation.


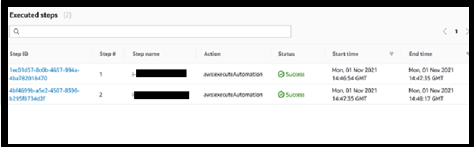
Step 6:Monitoring
Once the automation document is executed, you can monitor the execution status

We have learned how to Patch EC2 Instances from a Central Account. Please share your valuable feedback in the comment section.
Get your new hires billable within 1-60 days. Experience our Capability Development Framework today.
- Cloud Training
- Customized Training
- Experiential Learning
About CloudThat
CloudThat is a house of All-Encompassing IT Services on Cloud offering Multi-Cloud Security & Compliance, Cloud Enablement Services, Cloud-Native Application Development, OTT-Video Tech Delivery Services, Training & Development, and System Integration Services. Explore our consulting and expert advisory services here.
References

WRITTEN BY Deepak Surendran


Comments