

 Login
Login- Consulting
- Training
- Partners
- About Us
x
AWS, Cloud Computing, DevOps
 5 Mins Read

 May 17, 2016
In this blog we are going to show how we can install a WordPress with AWS Codepipeline.
Before we begin the demo, let us brief you about the services which will be used.
Amazon Web Services (AWS) is providing three services namely CodeCommit, CodeDeploy, CodePipeline as Developer Tools for the developers, which lets them to focus more on their application rather than deployment.

CodeCommit hosts private Git repositories, lets we to store code securely. You can store anything, anytime and integrate with other AWS & third-party services. Files can be easily migrated from any Git-based repository to AWS CodeComit.
CodeDeploy is developers service, which allows the users to deploy application (contains content such as code, web, scripts, etc). It helps in automated deployments, reduces downtime, have centralized control and easy to adopt.
CodePipeline is a continuous delivery service, which lets you to automate your release process using your favorite tools such as Amazon S3, CodeCommit, AWS Elastic Beanstalk, AWS CodeDeploy and Jenkins as well. You can view the progress at a glance. It helps in speeding up delivery while improving quality. It contains many stages to test your code before releasing.
Let’s begin with pre-requisites
Working knowledge of Linux, Amazon EC2, SNS, IAM, RDS & Git.
Region : N.Virginia
Pre-requisites
We need to have two IAM roles: a Service Role and an Instance Profile Role.
Create a role named as Service Role and paste the below policy.
|
1 2 3 4 5 6 7 8 9 10 11 12 13 14 15 16 17 18 19 20 21 22 23 24 25 26 27 28 29 |
{ "Version": "2012-10-17", "Statement": [ { "Action": [ "autoscaling:PutLifecycleHook", "autoscaling:DeleteLifecycleHook", "autoscaling:RecordLifecycleActionHeartbeat", "autoscaling:CompleteLifecycleAction", "autoscaling:DescribeAutoscalingGroups", "autoscaling:PutInstanceInStandby", "autoscaling:PutInstanceInService", "ec2:Describe*", "sns:*", "codecommit:*", "codedeploy:*", "codepipeline:*", "codecommit:GetBranch", "codecommit:GetCommit", "codecommit:UploadArchive", "codecommit:GetUploadArchiveStatus", "codecommit:CancelUploadArchive", "s3:*" ], "Effect": "Allow", "Resource": "*" } ] } |
Once the IAM role is created, we need to establish a trusted relationship for this role with AWSCodeDeploy. Modify trust relationship policy for this particular role and set it to below mentioned policy :
|
1 2 3 4 5 6 7 8 9 10 11 12 13 14 15 16 |
{ "Version": "2012-10-17", "Statement": [ { "Sid": "", "Effect": "Allow", "Principal": { "Service": [ "codedeploy.us-east-1.amazonaws.com", "codedeploy.us-west-2.amazonaws.com" ] }, "Action": "sts:AssumeRole" } ] } |
Instance Profile Role: EC2 instances needs to be launched with proper permissions to access files from S3 buckets.
|
1 2 3 4 5 6 7 8 9 10 11 12 13 |
{ "Version": "2012-10-17", "Statement": [ { "Action": [ "s3:Get*", "s3:List*" ], "Effect": "Allow", "Resource": "*" } ] } |
Note: Go to IAM (Identity Access Management), select the Role named AWS-Codepipeline-Service and paste the below conditions in the policy.
|
1 2 3 4 5 6 7 8 9 10 11 |
{ "Action": [ "codecommit:GetBranch", "codecommit:GetCommit", "codecommit:UploadArchive", "codecommit:GetUploadArchiveStatus", "codecommit:CancelUploadArchive" ], "Resource": "*", "Effect": "Allow" }, |
Step 1: Launch an EC2 instance with the Instance Profile role. While launching the instance Under Configure Instance Details page, expand Advanced Details, and in the User data field, type the following:
|
1 2 3 4 5 6 |
sudo yum update sudo yum install aws-cli cd /home/ec2-user aws s3 cp s3://aws-codedeploy-us-east-1/latest/install . --region us-east-1 chmod +x ./install sudo ./install auto |

Step -2 Go to AWS management console, select CodeCommit.
Step -3 Click Create new repository to create a repository

Step – 4 Create a repository by filling name and description.

Step – 6 Click Clone URL, then select SSH we will get url for cloning the repo in our local machine. Copy url, will be useful later in the process.

Step – 7 In your local system (Linux), do AWS configure. Move to /tmp/ and clone the codecommit repository.
Step – 8 Move to cloned repo, keep the zip file here containing your WordPress installation. Make changes in wp-config.php (like ‘DB_HOST’, ‘localhost’). After commiting push it into repo.
For verification, go to CodeCommit console, there you can find the details.
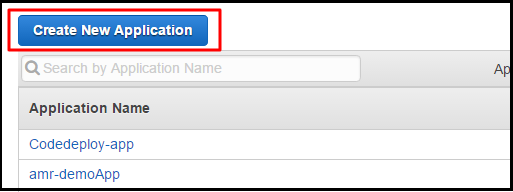
Step – 9 Now it’s time to create a CodeDeploy application. Switch to CodeDeploy console and select Create New Application.
Step – 10 Fill the required details and attach the EC2 instance launched in the beginning.

Step – 11 Select the Deployment Configuration according to our requirement. Then click Create trigger, it will allow us to make configuration for AWS SNS (Simple Notification Services).

Step – 12 Assign the Trigger name and Events we want to trigger. Then select the SNS topic for getting alerts of your deployment.

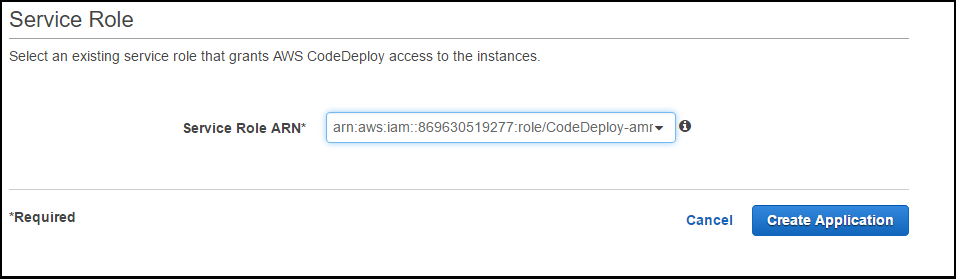
Step – 13 Select the Service-Role for deployment. Then click Create Application and our application will be ready.
Step – 14 Navigate to AWS CodePipeline, where we can create a pipeline. Give a name to pipeline then click Next step.

Step –15 Select the Source provider as AWS CodeCommit and fill the required details.

Step -16 Select Deployment provider as AWS CodeDeploy and fill the required fields.

Step – 17 Select the Role name as AWS-CodePipeline-Service and then click Next step. It will navigate us to the review page, after reviewing details click Create Pipeline. We will get a pipeline created.

We will get three stages of the deployment, namely No executions yet, In Progress, Succeeded or Failed.


1st Output
Now paste the Public IP of EC2 in browser.
We will get output as database error connection. As in the wp-config.php database is mentioned as local.
Now, change ‘DB_HOST’ from local to RDS by providing the end-point of RDS in wp-config.php. Then commit and push back to repo.
Navigate to CodePipeline then click Release change. Wait for the Deployment to be succeeded. Paste the Public IP of the EC2 in browser.
2nd Output
We will see WordPress installation page.

In short, we can say that AWS Codepipeline allows you to deploy WordPress on multiple servers without any downtime. Whenever we make changes to the configuration according to requirement, AWS Codepipeline lets you to release the change in no time.
In case of any questions, please feel free to post your comments. You could also share your experience installing WordPress using AWS Codepipeline here.
SHARE

Big Data, Cloud Computing
By Pankaj Choudhary
Apr 19, 2024

Case Study
By gopi
Apr 16, 2024


Case Study
By gopi
Apr 16, 2024

Power Platforms
By Rashi Mehrotra
Apr 12, 2024

Case Study
By Sohail Yaragatti
Apr 5, 2024

Case Study
By Sohail Yaragatti
Apr 5, 2024

Case Study
By Sohail Yaragatti
Apr 5, 2024
Case Study
By Sohail Yaragatti
Apr 1, 2024
Case Study
By Sohail Yaragatti
Apr 1, 2024
Our support doesn't end here. We have monthly newsletters, study guides, practice questions, and more to assist you in upgrading your cloud career. Subscribe to get them all!
khoi
Aug 24, 2016
There was nothing called “Code pipeline service”.Just 4 named Approve, CustomActionAccess, FullAccess and ReadOnlyAccess. Did you mean we have to create a new policy named CodePipelineService???
Amrendra Kumar
Feb 7, 2017
Hi Khoi,
Thanks for your valuable comments, either of the way we can create roles and polices.
Once you create a codepipeline project AWS will automatically create the role named “AWS-CodePipeline-Service”
with the required policies attached to role.
Since the blog was written when codecommit was in beta version. That’s why we had to paste above mentioned policy snippet (no. 4) manually. Since the AWS Developer tools are in stable version so AWS automatically creates required policies.
Regards,
Amrendra
khoi
Aug 24, 2016
Hello,
You should clarify a little bit about role and policy.
You just can’t paste the policy when creating role. I think we need to create new policy first and then create new role and assign the new role with that policy created before.