

 Login
Login- Consulting
- Training
- Partners
- About Us
x
AWS, Cloud Computing, News, Tutorials
 5 Mins Read

 November 5, 2014
My previous blog will give you an idea as to why HVM instances in AWS are better than PV instances and why people prefer using HVM instances over PV instances. Moreover, the HVM instances offered by Amazon are cheaper than the PV ones. For example, PV m1.medium costs $0.087 per Hour whereas, HVM m3.medium costs $0.070 per Hour. Inspite of the reduced price, we get same memory plus one more extra core with HVM. If you have a PV machine, you should definitely convert it to HVM because of the lower cost and also, PV instances might retire eventually.
These steps are strictly for RHEL based PV instances like Amazon Linux, CentOS, RedHat etc.
1. Login to your instance (SSH) .
2. Install grub on it.
*Grub selects a specific kernel configuration available on a particular operating system’s partitions.
|
1 |
sudo yum install grub –y |
3. Stop the instance and create snapshot of the root volume.
*To overcome the downtime here, you can alternatively create an image of your instance and launch another machine.
4. Launch an Amazon Linux ‘working‘ instance (PV) and login to that instance.
|
1 |
ssh -i path-to-your-pem-file.pem ec2-user@<machine-public-dns-name> |
5. Create a new ‘source’ volume (in the same AZ) from the snapshot created in step 3 and attach it to the ‘working‘ instance as /dev/xvdf. The ideal size of this volume could be kept same as your source instance (Step 1) or it can even be increased.
6. Create a new ‘destination’ volume (in the same AZ) from the snapshot created in step 3 and attach it to the ‘working‘ instance as /dev/xvdo.
7. Next, we partition the destination volume.
a. We use parted for partitioning the destination volume.
*Parted is a program for creating and manipulating partition tables.
|
1 |
sudo parted /dev/xvdo --script 'mklabel msdos mkpart primary 1M -1s print quit' |
Output:
|
1 2 3 4 5 6 7 8 9 10 11 |
Model: Xen Virtual Block Device (xvd) Disk /dev/xvdo: 8590MB Sector size (logical/physical): 512B/512B Partition Table: msdos Number Start End Size Type File system Flags 1 1049kB 8590MB 8589MB primary |
b. The OS kernel checks the partition table of destination volume which was modified and updates the table.
*partprobe to informs the operating system kernel of partition table changes, by requesting that the operating system re-read the partition table.
|
1 |
sudo partprobe /dev/xvdo |
c. Update the destination information.
*udevadm settle waits for udevd to process the device creation events for all hardware devices, thus ensuring that any device nodes have been created successfully before proceeding.
|
1 |
udevadm settle |
8. Check the ‘source’ volume.
a. e2fsck is used to check a Linux second extended file system.
|
1 |
sudo e2fsck -f /dev/xvdf |
Output:
|
1 2 3 4 5 6 7 8 9 10 11 12 13 |
e2fsck 1.42.8 (4-Nov-2014) Pass 1: Checking inodes, blocks, and sizes Pass 2: Checking directory structure Pass 3: Checking directory connectivity Pass 4: Checking reference counts Pass 5: Checking group summary information /: 39159/524288 files (0.3% non-contiguous), 366426/2097152 blocks |
b. Minimize the size of original filesystem to speed up the process and also to eliminate a copy free disk space in the next step.
*resize2fs program will resize ext2, ext3, or ext4 file systems. Run resize2fs to resize the ext2 filesystem to use all of the space in the newly enlarged partition.
|
1 |
sudo resize2fs -M /dev/xvdf |
Output:
|
1 2 3 4 |
resize2fs 1.42.8 (4-Nov-2014) Resizing the filesystem on /dev/xvdf to 346784 (4k) blocks. The filesystem on /dev/xvdf is now 346784 blocks long. |
Note: Write down the blocks and 4k values.
9. Duplicate the source volume to the newly partitioned destination volume.
*dd is a command on Unix systems whose primary purpose is to convert and copy a file. Note: Make sure you specify the exact number of bs and count values. (returned from the previous command). The execution of this command might take some time.
|
1 |
sudo dd if=/dev/xvdf of=/dev/xvdo1 bs=4K count=346784 |
Output:
|
1 2 3 4 5 |
346784+0 records in 346784+0 records out 1420427264 bytes (1.4 GB) copied, 166.497 s, 8.5 MB/s |
10. Resize the filesystem on the newly partitioned destination volume.
|
1 |
sudo resize2fs /dev/xvdo1 |
11. Next, we have to prepare the newly partitioned destination volume for the chrooted grub installation.
a. Mount the newly partitioned destination.
|
1 |
sudo mount /dev/xvdo1 /mnt |
b. Copy all the files archived from old destination to the newly partitioned one.
|
1 |
sudo cp -a /dev/xvdo /dev/xvdo1 /mnt/dev/ |
c.
|
1 |
sudo rm -f /mnt/boot/grub/*stage* |
d.
|
1 |
sudo cp /mnt/usr/*/grub/*/*stage* /mnt/boot/grub/ |
e.
|
1 |
sudo rm -f /mnt/boot/grub/device.map |
12. Next, we do an offline grub installation on the destination device in the chroot environment, which is required for the HVM instance. You need to be a root user to perform this step:
|
1 |
sudo su |
Execute the code below:
|
1 2 3 4 5 6 7 8 9 |
sudo cat <<EOF | chroot /mnt grub –batch device (hd0) /dev/xvdo root (hd0,0) setup (hd0) EOF |
13. Remove the old destination volume from the new destination volume.
|
1 |
sudo rm -f /mnt/dev/xvdo /mnt/dev/xvdo1 |
14. Updating the new grub configuration.
*tty prints the filename of the terminal connected to standard input.
|
1 |
vi /mnt/boot/grub/menu.lst |
Change root (hd0) to root (hd0,0)
– Add (or replace console=*) console=ttyS0 to kernel line.
– Replace root=* with root=LABEL=/ in the kernel line.
– Go to /mnt/boot/grub/menu.lst – *ensure the filenames match the files in /mnt/boot
a.
|
1 |
cd /mnt/boot |
b.
|
1 |
ls |
Output:
|
1 2 3 4 5 |
config-3.4.43-43.43.amzn1.x86_64 initramfs-3.4.43-43.43.amzn1.x86_64.img efi System.map-3.4.43-43.43.amzn1.x86_64 grub vmlinuz-3.4.43-43.43.amzn1.x86_64 |
c. Once you verify that the filenames are same, save and quit the file (:wq).
|
1 |
vi /mnt/boot/grub/menu.lst |
15. Update.
*fstab gives you the static information about the filesystems.
|
1 |
vi /mnt/etc/fstab |
Update the root (/) entry in /mnt/etc/fstab, as per the sample fstab below:
Output:
|
1 2 3 4 5 6 7 8 9 |
LABEL=/ / ext4 defaults,noatime 1 1 none /dev/pts devpts gid=5,mode=620 0 0 none /dev/shm tmpfs defaults 0 0 none /proc proc defaults 0 0 none /sys sysfs defaults 0 0 |
16. Change the label on the filesystem.
a. e2label command changes the label on an ext2 filesystem i.e; /dev/xvdo1
|
1 |
e2label /dev/xvdo1 / |
b.
|
1 |
sync |
c. Come out of mnt directory and unmount the device:
|
1 |
umount /mnt |
17. Final Steps. Create a snapshot of the ‘destination’ volume. Select your snapshot and under Actions click Create Image as shown in the below image. 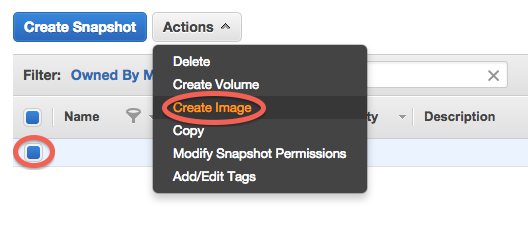
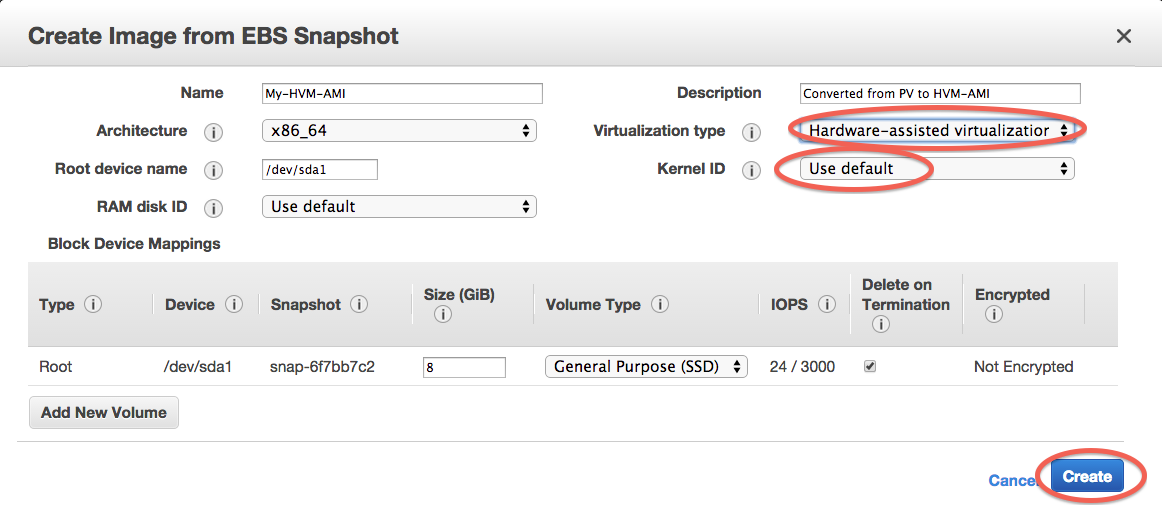
Select Virtualization type as Hardware-assisted virtualization, use the default Kernel ID and click Create.
Launch instance from the above AMI. The new HVM instance should now boot successfully and will be an exact copy of the old source PV instance (if you used the correct source volume). Once you have confirmed that everything is working, the source instance can be stopped. Cleanup by removing all temporary volumes (source and destination).
Stay tuned to my next blog where I talk about converting Ubuntu-based PV to HVM along with detailed steps.
Let me know if you have any questions by commenting below.
SHARE

Case Study
By gopi
Apr 16, 2024


Case Study
By gopi
Apr 16, 2024

Power Platforms
By Rashi Mehrotra
Apr 12, 2024

Case Study
By Sohail Yaragatti
Apr 5, 2024

Case Study
By Sohail Yaragatti
Apr 5, 2024

Case Study
By Sohail Yaragatti
Apr 5, 2024
Case Study
By Sohail Yaragatti
Apr 1, 2024
Case Study
By Sohail Yaragatti
Apr 1, 2024
Case Study
By Sohail Yaragatti
Apr 1, 2024
Our support doesn't end here. We have monthly newsletters, study guides, practice questions, and more to assist you in upgrading your cloud career. Subscribe to get them all!
Thadikaran
Feb 12, 2019
The instance is running but not able to connect(SSH). Is there anyone facing the same issue. Our OS is Amazon Linux 2.
Steps to convert UBUNTU-BASED PV instances to HVM | CloudThat's Blog
Dec 5, 2014
[…] previous blog will help you convert Rhel-based PV instances to […]